The Stamp Review Crew features Awesomely Artistic

SRC-Awesomely-Artistic-bann


It’s never fun to admit defeat, especially to a stamp set but I have to admit, I came close on this one. This week The Stamp Review Crew features Awesomely Artistic. I guess I’m not awesomely artistic because this week was really challenging for me. This stamp set is not my style and I actually found myself just staring at the images for quite some time trying to come up with a unique idea. I purposefully didn’t search for other ideas and samples because I wanted to give this ‘not my style’ set, some of my style. In the end, I liked my project but I am really keen to do the hop this week to see other wonderful uses for the set and fall in love with it… as so often happens.

I decided to use the best stamp in the set, the dragonfly. Am I right? I do love the dragonfly and so I wanted to feature him. I started off with plans to do a very neutral sort of card, perhaps stamped on the scientific text dsp from the Typeset papers but I couldn’t get that to look quite right. Next I decided I wanted to try the cracked glass technique. I’ve never done it before but thought it would look quite science-y and vintage which is what I was aiming for.

I first did a watercolour wash in Pool Party and then stamped the scientific name for a dragonfly randomly using my Alphabet Rotary Stamp. Then I followed the steps in this cracked glass technique tutorial from http://www.splitcoaststampers.com. The card turned into a home decor piece and ended up looking like this…

Awesomely Artistic home decor for The Stamp Review Crew. Details @ www.thepapercaper.com.auAwesomely Artistic home decor for The Stamp Review Crew. Details @ www.thepapercaper.com.auAwesomely Artistic home decor for The Stamp Review Crew. Details @ www.thepapercaper.com.au

So it didn’t really end up anything like I thought it would when I started out but I made it and I like it. So take that Awesomely Artistic! Now I’m off to check out the other ideas because I sure need them. Care to come with me? Let’s visit my fellow Aussie, the wonderfully creative Rochelle Blok.

SRC-Awesomely-Artistic-next

If you need to go backwards, you’ll find the amazing Nikki Spencer or you can head back to The Stamp Review Crew HQ to see the full list of blog hop participants.

SRC-Awesomely-Artistic-prev

Jess x

Shop Stampin' Up! supplies @ http://www3.stampinup.com/ECWeb/default.aspx?dbwsdemoid=4003910


Click to shop

Gettin’ Artsy while I’m… CASEing the Catty

Today the CASEing the Catty crew is looking at samples from the Artistic Expression section of the catalogue. I think that may have been a nice way to say ‘miscellaneous’. They are some great stamp sets and samples in this section and I guess they’re here because they don’t particularly fit into another category. It’s another BIG section and at first glance, I thought today’s post might feature at least seven different cards because I was having trouble choosing what to CASE. In the end, I chose two different cards to CASE.

The first is this splatter-y one below. My favourite style of cards are a bit artsy and splattery and inky. I love ending up with inky fingers!

Annual15_p122_c

I decided to make a few changes to the card. I wanted the splatters to be the hero so I decided to use bright colours with only black and white cardstock and embellishments. Here’s my first sample..

Gorgeous grunge splatter card for CASEing the Catty. Details @ www.thepapercaper.com.au


Ooh, there’s my favourite washi again! Next up, I went with a more ‘me’ colour palette and added in some coloured twine.

Gorgeous grunge splatter card for CASEing the Catty. Details @ www.thepapercaper.com.au


I love baker’s twine, but sometimes it’s too thick. I took my strands apart and used single strands instead. Lastly, I needed to make a birthday card for my brother in law this weekend so I went with some ‘man’ colours and changed up the greeting.

Gorgeous grunge splatter card for CASEing the Catty. Details @ www.thepapercaper.com.au


See that washi? It’s from the Sweet ‘lil Things washi tape set, aka, the baby set. Doesn’t look too baby here does it?

Gorgeous grunge splatter card for CASEing the Catty. Details @ www.thepapercaper.com.au


The next card I wanted to CASE was this one below…

Annual15_p132_a

I was drawn to it because of the DIY quote. Obviously no one company is going to be able to cater 100% to all your quote needs so I love this idea of stamping your own with the Alphabet Rotary stamp. It took me a year to get this tool and now I wonder how I ever did without it!

Quotes are funny things these days. There are just SO many floating around social media and the Internet in general and you really have to question whether or not the person they’re attributed to actually said them. I digress. I had some fun googling quotes but in the end, I couldn’t go past a great one from Dr Seuss. When I read it, it reminded me that one of his books in particular has some really awesome advice! My quote is from ‘Oh, the Places You’ll Go’. It is a fabulous book. The last few lines are “… you’re off to great places. Today is your day! Your mountain is waiting. So… get on your way!” WORD!

DIY quote card featuring Dr Seuss for CASEing the Catty. Details @ www.thepapercaper.com.au

I think this card would be perfect for a grad or maybe for a ‘just because’ card or pick me up. Did you spot the sneaky peek product? I couldn’t help but use it, it just had to be used on a Dr Seuss inspired card!

DIY quote card featuring Dr Seuss for CASEing the Catty. Details @ www.thepapercaper.com.au


I hope you’ve enjoyed my projects. If you’ve started the hop from my page, you can continue on to Stasia Sloma for more inspiration. Otherwise you’ve reached the end of the hop. You can head back to CASEing the Catty HQ to see the full list of blog hop participants.

11393133_10203757988465113_4816079528003034501_n

Jess x

Shop Stampin' Up! supplies @ http://www3.stampinup.com/ECWeb/default.aspx?dbwsdemoid=4003910


The Stamp Review Crew features Crazy About You

I learnt something new this week. I hear that our U.S. friends don’t use the word fortnightly. Say wha? Apparently they use bi-weekly which to us Aussies could mean either twice per week or once every two weeks. So, I’m going to stick with the non-ambiguous word, fortnight… on with the post!

SRC-Crazy-About-You-banner

This fortnight, The Stamp Review Crew features Crazy About You. Did someone say versatile sayings stamp set? Look no further, check out this beauty…

138859GImagine the possibilities! That’s exactly where I started. Looking at the different combinations I could create with the words. There are also some extra words available in the coordinating framelits pack. The words ‘spring’ and ‘sunshine’ jumped out at me (as we’re heading into our third month of winter – boo) and I started to imagine how I could use them on my card. Here’s what I ended up with…

The Stamp Review Crew features Crazy About You by Stampin' Up!

Oh, I just love it. The vision in my head actually transferred well onto paper! I have so many loves… the almost unseen bokeh, the colourful pinwheel with gold thread and of course that glittery ‘happy’.

The Stamp Review Crew features Crazy About You by Stampin' Up!


I hope my colourful card has added a smile to your face as you start the week!

Now please hop along and visit the wickedly wonderful Wendy Weixler and enjoy her fabulous projects.

SRC-Crazy-About-You-next

If you need to backtrack, click here to visit Heidi Baks and click here to visit The Stamp Review Crew HQ and see the full list of participants.

SRC-Crazy-About-You-prev

Jess x

Shop Stampin' Up! supplies @ http://www3.stampinup.com/ECWeb/default.aspx?dbwsdemoid=4003910


CLICK PRODUCTS TO SHOP ONLINE

Ribbons and wreaths and… CASEing the Catty

Welcome to the last spot on this week’s CASEing the Catty blog hop. You’ve probably gathered by now (unless you’re starting here, in which case you’ll find links to keep hopping at the bottom) that we’re featuring cards from the Christmas section of the catalogue. This week has been a bit exciting for us Stampin’ Up! demos as we’ve all just seen the brand new Holiday catalogue which will be available to order from in September.

Spoiler alert – If you want to find some sneaky peeks, I suggest searching #inspirecreateshare2015 and you just might stumble across some exciting pics from the recent US convention where it was all unveiled. BUT, you should do that after you’ve finished our hop. Don’t get too excited and leave me 😦

It’s a bit crazy thinking about Christmas now, unless you’re doing a Christmas in July event, but time does tend to fly so why not start thinking about your Christmas cards in advance. If you make them early, it’ll remove a little bit of stress from the busy end of the year.

Annual15_p072

I decided to CASE a card from page 72 but even though I love Wondrous Wreath, after seeing all the new goodies, it seems so ‘last year’! I decided to change up my wreath and use a non-Chrsitmas set. Yep, it’s back again – Timeless Love. I do recall saying it would feature heavily on my blog this year. It is totally adorbs. So I stamped the spray twice making a wreath, lining it up with my trusty stamp-a-majig. Then I coloured. Red and Green of course, or more accurately, Cherry Cobbler and Always Artichoke. It reminded me a little more of Australian native flowers than the holly and ivy that says ‘traditional Christmas’. Instead of the chalkboard centre featured in the sample, I went with burlap to add to the native, Aussie bush feel. A sentiment stamped on veluum went over the top of the burlap and a sparkling, festive silver ribbon finished it off.

Timeless Love meets Christmas for CASEing the Catty. Details @ www.thepapercaper.com.auTimeless Love meets Christmas for CASEing the Catty. Details @ www.thepapercaper.com.au

Happy counting down until Christmas! 146 days to go!

Click here to continue on the blog hop and visit the lovely Judy May or click here to head to CASEing the Catty HQ for a full list of participants.

11393133_10203757988465113_4816079528003034501_n

Jess x

Shop Stampin' Up! supplies @ http://www3.stampinup.com/ECWeb/default.aspx?dbwsdemoid=4003910


CLICK PRODUCTS TO SHOP ONLINE

You might like…

Timeless Love & Sympathy for CASEing the Catty. Details @ www.thepapercaper.com.au. Stampin' Up! supplies: Timeless Love stamp set, Rose Red, Sahara Sand, Mint Macaron, StazOn and VersaMark inks...Timeless watercolour Love for EurekaStampers blog hop. Details @ www.thepapercaper.com.au. Stampin' Up! supplies: Timeless Love stamp set, Calypso Coral seam binding, Everyday Chic washi tape, Pink Pirouette, Blushing Bride and Calypso Coral inks...Baby girl card featuring PLxSU. Details @ www.thepapercaper.com.au. Stampin' Up! Supplies: Moments Like This Project Life card collection, Timeless Love stamp set, Alphabet Rotary stamp, Blushing Bride cardstock...

Man Thanks

I don’t do man cards. Well I didn’t. If ever there was a male birthday in our family or cards to make for Dad or Grandad etc. I’d get the kids to do it. They love making cards as much as I do but it’s still a bit of a cop out.

Recently I decided there was a man I needed to thank. He’s no relation so sadly, I didn’t think a card from my kids would cut it. There was nothing for it but to charge on in and make a man card!

I started with a card from the Moments Like This Project Life card collection. There are some really great neutral cards in that collection with black and white stripes and letters. I chose a striped card. My idea was to build on this background by playing with some ink and making, well, a bit of a mess.

11791621_10154091555131686_1148979393_n

I kinda loved it! Messy look achieved! And then the plan that I had for it didn’t really work…

11774244_10154091557486686_646117943_n

Boo hoo. I really should have thought that through better! Oh well… It’s now in the unfinished project pile waiting for a new use. And I started again. Luckily, there are quite a few suitable cards in the collection!

Once I had re-made my background, I cut ‘thanks’ out of it using the Little Letters Thinlit dies. And to go with my messy look, I did not even make them straight. Nope. I call it the ‘lazy’ technique. Then I added some stitching, some Chevron Ribbon (well the back of it anyway), some burlap and a little flag. Here’s how it ended up…

Man Thanks featuring Moments Like This PLxSU card collection. Details @ www.thepapercaper.com.auMan Thanks featuring Moments Like This PLxSU card collection. Details @ www.thepapercaper.com.au

Will you look at that? I CAN make a man card. Oh no. Now there are no more excuses.

Thanks for reading… now go and play and get messy!

Jess x

Shop Stampin' Up! supplies @ http://www3.stampinup.com/ECWeb/default.aspx?dbwsdemoid=4003910Shop handcrafted cards @ https://www.etsy.com/shop/ThePaperCaperEtsy

Click products to shop

Other related projects you might like…

Amazing colourful Birthday swap. Details @ www.thepapercaper.com.au. Stampin' Up! supplies: Amazing Birthday, Gorgeous Grunge, White StazOn, Crushed Curry, Island Indigo, Blackberry Bliss, Melon Mambo inks...batman_compLittle Letter FRIEND Framelits for CASEing the Catty Challenges. Details at www.thepapercaper.com.au & www.facebook.com/papercaperCTC#1_squareProject Life by Stampin' Up! featuring Moments Like These collection. Details @ www.thepapercaper.com.au #PLXSU

Let Them Eat Cake

Every now and then I have the opportunity to make a beautiful cake for someone special. In this case it was for two people. On Saturday Christie and Nathan tied the knot after a whirlwind romance (how romantic) and I had the honour of making their wedding cake.

A few weeks ago, Christie came to me with a picture of a silhouette cake she’d seen from a London bakery and asked me to recreate it. It seemed simple enough… if you had an e-cutter that you could feed fondant through. I didn’t. But I decided that it would still be possible to do it all by hand. She also gave me some specific silhouettes that were symbolic of their relationship.

The bottom tier featured them as a courting couple. They often visited the local gardens and this scene also includes Christie’s son playing nearby.

Silhouette wedding cake for Christie & Nathan. Details @ www.thepapercaper.com.au

The middle tier features the proposal scene…

Silhouette wedding cake for Christie & Nathan. Details @ www.thepapercaper.com.au

… and the top tier features the wedding ceremony.

Silhouette wedding cake for Christie & Nathan. Details @ www.thepapercaper.com.au

And here it is in full.

Silhouette wedding cake for Christie & Nathan. Details @ www.thepapercaper.com.au

I was glad to hear that they loved it.

If you’d like to see more of my cakes, visit my album here.

We’ll return to our regular papercraft posts very soon!

Jess x

Shop Stampin' Up! supplies @ http://www3.stampinup.com/ECWeb/default.aspx?dbwsdemoid=4003910Shop handcrafted cards @ https://www.etsy.com/shop/ThePaperCaperEtsy

You might like…

The Stamp Review Crew features Watercolour Wings. Stamping on fondant icing. Details @ www.thepapercaper.com.auWedding Cake for my Grannie. Details @ www.thepapercaper.com.aukate_ben_cake


The Stamp Review Crew features Watercolor Wings

SRC-Watercolor-Wings-banner

Welcome to another blog hop from The Stamp Review Crew. This week we’re featuring the very popular Watercolor Wings stamp set. Along with many other stampers, this set was one of my ‘must have’ sets from the moment I saw it. You’ll find a lot of inspiration on today’s blog hop but I’d be very surprised if there is a similar post to mine out there. That’s right, I’m taking you beyond the usual comfort zone of papercraft so hang on to your hat!

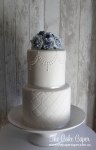
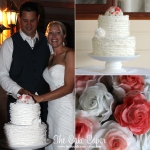
Many crafty types dabble in more than one hobby and I am no exception. Several years ago I took a few months’ course in cake decorating and ever since, I’ve created the odd special occasion cake. This week I’ve been making a wedding cake for my sister-in-law’s sister, or my husband’s brother’s wife’s sister for those who want the detail. I’ll be blogging pics of the cake in a day or two so check back to see or sign up to my blog if you don’t want to miss it. It got me thinking about using stamps for more than their intended purpose.

I had the idea to use Watercolour Wings to stamp on fondant icing. I thought the butterflies would particularly lend themselves to cupcake decorations. So once the cake was done and dusted, I decided to give my idea a go.

The Stamp Review Crew features Watercolour Wings. Stamping on fondant icing. Details @ www.thepapercaper.com.au

After a bit of trial and error with regards to how dry the icing should be, I achieved some pretty butterflies.

Step 1. Roll out your fondant until it is quite thin. Bear in mind that the thinner you go, the more elegant they will look but the more fragile they will be.

Step 2. Let the fondant dry until it is quite firm.

Step 3. Choose your desired food dye colours. You’ll want to dilute the base colour with water as there are three layers to the Watercolour Wings butterflies. Paint your stamp with a paintbrush and diluted food dye and stamp. Next use a little more intense colour for the second layer and then the undiluted colour for the top layer of stamps.

Note: In our house we only use Hopper Natural Colours. There’s no way I let nasty lab chemical colours near the mouths of my babes. This is my passionate (can you tell?) personal preference but you can use any food dye.

Step 4. Let your fondant dry out a little again.

Step 5. Grab your Bold Butterfly framelits and cut out your fondant butterfly with your Big Shot. Yep indeedy, you can use your Big Shot to cut icing! You could protect your icing with wax paper but I just used the framelit by itself and it worked fine.

Step 6. If your fondant is still pliable, you can fold up the wings to the desired shape and leave it to dry thoroughly on some foam (or anything that will keep it in the desired shape whilst it dries out).

Here’s my first attempt. Not bad. Love pink!

The Stamp Review Crew features Watercolour Wings. Stamping on fondant icing. Details @ www.thepapercaper.com.au

I decided I wanted to try mixing up the colours a bit. Fortunately food dye is just like regular ink. You can mix and match and create new colours all you like. I decided to mix some pink and yellow for a peach colour for my next base. Then I added a layer of pink around the edges and finally dark yellow spots and centre on the top.

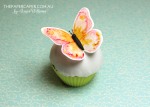
It went well… until I broke off a wing 😦 Not to worry I thought. Originally my plan was to use buttercream icing and just stick the wings into the soft icing but I changed my mind. Inspired by the butterfly body in the stamp set, I molded my own little body out of some black fondant I used on the wedding cake. I also remembered that I had some black stamen somewhere around so they came in handy for the antennae. Perfect. I love when accidents turn out to be happy accidents.

The Stamp Review Crew features Watercolour Wings. Stamping on fondant icing. Details @ www.thepapercaper.com.au

I love how this little guy turned out even better than the first one.

I hope I’ve inspired the creator in you to have a go at stamping on fondant. You should be able to get fondant in the baking aisle of your local grocery store. If not, a specialised cake decorating supplies store will have it by the truck load.

Now hop along to the amazing Heidi Baks. She has more inspiration for you!

SRC-Watercolor-Wings-next

If you need to backtrack, click here to visit the fabulous Nancy Smith, or click here to return to The Stamp Review Crew home for a full list of participants.

SRC-Watercolor-Wings-prev


EDIT: When photopolymer stamps were first released, Stampin’ Up! stated that they were made from FDA approved, food grade material. I’ve since seen some information that questions this statement so until I can find a definitive answer, it’s probably best to treat your butterfly as purely decoration and remove before eating.

Jess x

Click products to shop 24/7

You might like…

c&n_cake_settingWedding Cake for my Grannie. Details @ www.thepapercaper.com.aukate_ben_cake

Making Memories… and CASEing the Catty

I’m pretty pumped that this week’s CASEing the Catty blog hop is focusing on Project Life. I fell in love with Project Life the minute I heard about it and it’s my personal preferred method of memory keeping my family photos.

If I’ve lost you already, watch this quick video which explains the concept of Project Life, or as I like to call it, scrapbooking for the time poor, which is almost everyone these days, so it’s probably for you too!

For my ongoing, everyday album I use a large 12″ x 12″ album but did you know that Stampin’ Up! offers a smaller 6″ x 8″ album that is perfect for brag books, showcasing particular travels or other smaller occasions (just like the one shown in the video above). I’ve used this album to put together a brag book of sorts. It includes lots of photos that were taken at a family professional photo shoot so eventually I’ll probably give it to my grandparents, or perhaps I’ll just make a second one.

Here’s the cover. This album comes with a kraft board cover (with fabric spine covering) so you can actually decorate it any way you like. I’ve chosen to simply print an enlarged photo and stick it to the front. Add a ribbon to cover the join and it’s a professional looking album.

I’ve used both the Moments Like These card collection and Moments Like These accessory pack to embellish my pages. Because this book is mostly photos, and it’s on show at my demonstrations, I’ve chosen not to add journalling cards, rather using the decorative ‘filler’ cards to fill the gaps where I don’t have photos.

Again this page shows mostly photos but with a cute filler card which I made up from both Moments Like These packs. Notice also that I’ve rounded the corners of my photos and my filler cards. The original Project Life cards came with pre-rounded corners so most Project Lifers prefer this BUT Stampin’ Up Project Life card collections have square corners giving you the option of leaving them square or rounding them with a corner punch.

Many of the elements in the accesory packs are self adhesive so you can even decorate your photos.

I hope this post has given you a small insight into the wonderful world of Project Life. Here are a couple of quick thoughts…

  • Project Life can be as simple or complicated as YOU want it to be. In this album, I’ve used the accessory pack to embellish cards and photos. In my day to day album, I don’t. I just don’t have time. I simply add photos, some journalling and pop filler cards into the gaps. If you’re someone who thinks that this isn’t ‘enough’, don’t limit yourself! Use the accessory packs to embellish! Use Stampin’ Up!’s coordinating cardstock colours and inks to make your own filler cards. Add stamps! Do what you want to do to preserve your memories how you want them to be.
  • Project Life does not have to be about anything in particular. It doesn’t need to be a special occasion to warrant recording it. Have you ever looked back at photos from your childhood and though ‘Oh, I remember those shoes – I loved them’ or ‘yes, that was my favourite playground’. Record the everyday – you’ll thank yourself in years to come!
  • My VERY favourite thing about memory keeping is that my boys LOVE to pull down the album and flip through remembering their birthday cakes, this outing or that adventure. It warms my heart to see them enjoying what I’ve documented.

Where to from here?

Visit this link to see the range of Project Life by Stampin’ Up! range of Albums, photo pocket pages, card collections and accessory packs. Choose the items that best suit your style and needs and get memory keeping! If you have questions, just contact me (jess_williams@optusnet.com.au), I would love to help you get started!

And just when you thought I’d finished, Project Life cards don’t have to be just for Project Life. If you’ve completed an album and have spare cards, make a card! Here’s a sample using a card from the Moments Like This card collection.

Now it’s time to continue the blog hop. I can’t wait to see what everyone else will share about Project Life! Click here to hop along to the ever delightful Emma Palonek of Vintage Graffiti.

11393133_10203757988465113_4816079528003034501_n

Jess x

Shop Stampin' Up! supplies @ http://www3.stampinup.com/ECWeb/default.aspx?dbwsdemoid=4003910Shop handcrafted cards @ https://www.etsy.com/shop/ThePaperCaperEtsy

Click products to shop 24/7

Boxes, Butterflies, Bling & Boards

On Sunday I was invited around to Amanda’s house to run a Stampin’ Up! workshop. At a previous workshop I had demonstrated the Envelope Punch Board (EPB) and Amanda was keen for me to show her friends just how versatile this tool really is.

Yeah, yeah – it can make envelopes and has measurements for 66 sizes! Yep, 66! But still, that’s a little predictable.

133774O2


Here are some file tabs I made for my son’s teacher with the EPB…

envelope_punch_board_stampin_up


Want more? How about my favourite use? Christmas Crackers…

Oh Snap! I 'crack-er' myself up! Details @ www.thepapercaper.com.au

Not sold yet? Here’s Amanda’s favourite. The humble gift box.

Amanda's Gift Box. Workshop make & take. Details @ www.thepapercaper.com.au. Stampin' Up! supplies: Envelope Punch Board, Elegant Eggplant & Sahara Sand cardstock, Papillon Potpourri stamp set, Elegant Butterfly punch...

You can make them in all sorts of shapes and sizes depending on the size card you start with. We started with a 21cm x 21cm piece of card which is simply just a piece of A4 cut into a square. You can find loads of YouTube tutorials on making these boxes simply by Googling something like “envelope punch board box”.

After using the EPB to create our box shape we used a Dotty Angles stamp to add some confetti type dots to the sides of the box in VersaMark ink. Then we used SNAIL to adhere our box together. Next we made a belly band, simply by wrapping a piece of 1 1/2″ x 12″ piece of Fancy Foil Silver Vellum around the box, creasing it at the corners and adhering it back on itself where it meets at the top. Then, to hide the ends of the belly band, adhere a decorative piece of card across the top. We used a die cut from Lots of Labels Framelits in Sahara Sand.

Amanda's Gift Box. Workshop make & take. Details @ www.thepapercaper.com.au. Stampin' Up! supplies: Envelope Punch Board, Elegant Eggplant & Sahara Sand cardstock, Papillon Potpourri stamp set, Elegant Butterfly punch...

We then stamped and coloured a butterfly from the Papillon Potpourri stamp set using black StazOn ink and Elegant Eggplant, Wisteria Wonder and Sahara Sand markers. Tip: You’ll want to use permanent ink to ensure that the water based markers don’t make the ink run and bleed.

We punched out the coloured butterfly and layered it on top of two more layers of vellum butterflies just to make him a bit more ‘fluttery’.

Amanda's Gift Box. Workshop make & take. Details @ www.thepapercaper.com.au. Stampin' Up! supplies: Envelope Punch Board, Elegant Eggplant & Sahara Sand cardstock, Papillon Potpourri stamp set, Elegant Butterfly punch...Amanda's Gift Box. Workshop make & take. Details @ www.thepapercaper.com.au. Stampin' Up! supplies: Envelope Punch Board, Elegant Eggplant & Sahara Sand cardstock, Papillon Potpourri stamp set, Elegant Butterfly punch...

I had a fabulous time teaching Amanda and her friends how to make this beauty. It’s simple when you know how and totally re-creatable at home. In fact more than half of the attendees bought an EPB to use at home. I think that means they liked it!

At just $32, including 2 x punches and a scoring tool/bone folder, you can’t beat the value for something so versatile. Questions? Email me at jess_williams@optusnet.com.au. Sold? Buy one here for delivery to your door!

Jess x

Shop Stampin' Up! supplies @ http://www3.stampinup.com/ECWeb/default.aspx?dbwsdemoid=4003910Shop handcrafted cards @ https://www.etsy.com/shop/ThePaperCaperEtsy


Click products to shop 24/7

You might also be interested in…

Oh Snap! I 'crack-er' myself up! Details @ www.thepapercaper.com.auenvelope_punch_board_stampin_upCASEing Connie Collins. Details @ www.thepapercaper.com.au

It’s all for kids… at CASEing the Catty

This week at CASEing the Catty, we’re checking out the section called ‘For Kids’. By default this week, my projects are featuring the No Bones About It stamp set because it’s the only one from this section that I own. It’s a fabulous set for dinosaur lovers of all ages and I knew it would be a must have in my household of 3 boys.

Annual15_p042_a

I really liked the card on the left of these samples but I did chnge it up a little as I didn’t really like the way the sentiment was stamped. Here’s my version…

No Bones About It for CASEing the Catty. Details @ www.thepapercaper.com.auStampin' Up! supplies: No Bones About It stamp set, Cucumber Crush, Marina Mist, Tangelo Twist & Crushed Curry ink pads, Cucumber Crush & Whisper White cardstock...

I love how bright and colourful the card turned out. I must say I’m really warming to Cucumber Crush. I have a customer who fell in love with it straight away and her enthusiasm is starting to rub off on me!

I decided to do a second card as the first was almost a straight CASE. My next project was to show that you can use the layouts of cards and simmply change up the stamp set and colours so that they work for you. Here’s the sample my next card was based on.

Annual15_p047_a

And here’s my card…

No Bones About It for CASEing the Catty. Details @ www.thepapercaper.com.auStampin' Up! supplies: No Bones About It stamp set, Marina Mist, Tangelo Twist, VersaMark and StazOn inks, Whisper White and Tip Top Taupe cardstock...

See it’s as easy as pie, so go and get CASEing! If you use a sample from the For Kids section, make sure you tell us your blog post URL in the comments on this post and we’ll add you into the blog hop!

If you started at the beginning of our hop, you’ve reached the end and can go and get crafty! If you came in halfway through, click here to connect to the amazing Bronwyn Eastley

11393133_10203757988465113_4816079528003034501_n

… or click here to return to CASEing the Catty headquarters!

Jess x

Shop Stampin' Up! supplies @ http://www3.stampinup.com/ECWeb/default.aspx?dbwsdemoid=4003910Shop handcrafted cards @ https://www.etsy.com/shop/ThePaperCaperEtsy


Click products to shop 24/7